This guide sets up Okta for Qooling end to end: single sign-on so your people log in to Qooling with their Okta account, and provisioning so accounts are created, updated and deactivated in Qooling automatically from Okta. Allow about 20 minutes. You need administrator access to both Okta and Qooling.
What you get
Single sign-on
- Users sign in to Qooling from the Okta dashboard, or from the Qooling login page
- No separate Qooling password to manage
Automatic provisioning
- New users in Okta are created in Qooling
- Profile changes in Okta are pushed to Qooling
- Deactivating a user in Okta deactivates them in Qooling
- Users can be reactivated
- Groups can be pushed, updated and deleted
- Existing Qooling users can be imported into Okta
Before you start
The Okta connector only appears in Qooling once the Integrations and Okta modules are enabled on your contract.
You will also need:
- An administrator account in Qooling
- An administrator account in Okta
- The Qooling application added to your Okta organisation, from the Okta application catalogue
Step 1 — Open the Okta connector in Qooling
- Sign in to Qooling as an administrator.
- Go to Integrations, then click New integration.
- Select Okta.
- In the SAML single sign-on section, tick Enable SAML authentication.
You will see this dialog. It needs two values, both taken from Okta:
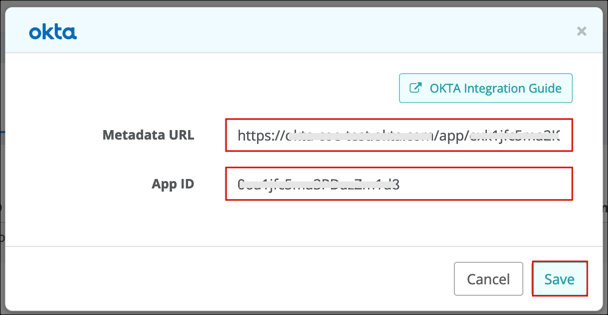
The Okta connector in Qooling — Metadata URL and App ID, then Save.
Metadata URL
In Okta, open the Qooling application and go to the Sign On tab. Copy the Identity Provider metadata link and paste it into Metadata URL.
It looks like this:
https://<your-okta-domain>/app/exk1a2b3c4d5e6f7g8h9/sso/saml/metadata
App ID
In Okta, select the General tab for the Qooling application and scroll down to App Embed Link. It has this form:
https://<your-okta-domain>/home/qooling/0oa1a2b3c4d5e6f7g8h9/abcdefgh
                                         ^^^^^^^^^^^^^^^^^^^^
                                         this part is your App ID
Copy only the middle segment — the part starting 0oa — and paste it into App ID.
⚠️ Two mistakes account for most failed setups
Do not paste the example value. Okta's own screens show a sample App ID. If you copy the example instead of your own value, provisioning will fail with a "not linked to any Qooling company" error.
Do not confuse the two identifiers. The Metadata URL contains a code starting exk. Your App ID starts 0oa. They look similar and sit close together, but they are different values — pasting the exk one into App ID is a common and silent failure.
5. Click Save.
?
While you are in Okta, check the Base URL field on the General tab is correct. A wrong value here prevents SSO sign-in to Qooling.
Step 2 — Set the Okta application username to Email
Qooling identifies people by email address. Okta must therefore send the email address as the application username, or Qooling cannot match users correctly.
- In your Okta application, go to the Sign On tab and click Edit.
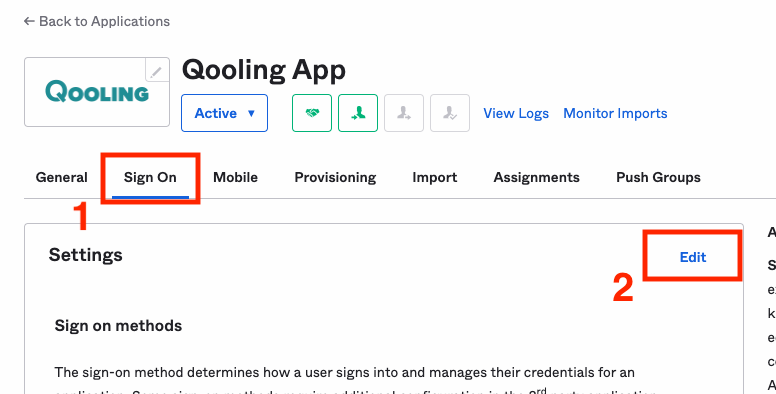
Okta application, Sign On tab — click Edit.
2. Set Application username format to Email, then click Save.
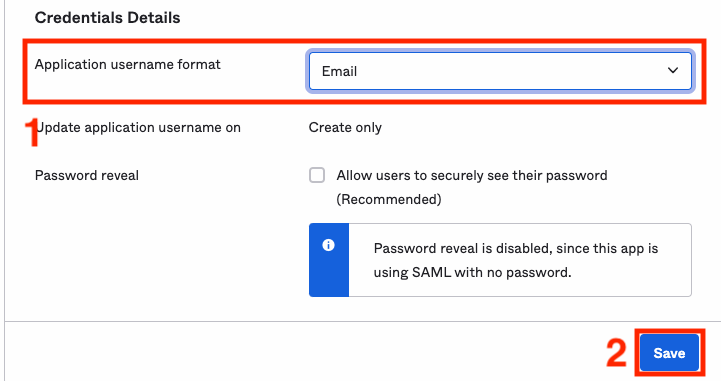
Set Application username format to Email.
⚠️
Leave the setting just below it, Update application username on, set to Create only. It does not control the email address in Qooling — it controls the Qooling username, which is also the value Okta uses to recognise an existing person. Setting it to Create and update means a change to someone's Okta login silently renames their Qooling username. Provisioning never changes a Qooling user's email address; if someone's address really changes, update it in Qooling.
Step 3 — Generate the connection token in Qooling
The token is created in Qooling and pasted into Okta — not the other way round. Older instructions described generating a token inside Okta and entering it in Qooling. That is no longer how it works, and there is no field in Qooling to accept such a token. If you have been trying to do that, this step is where you were stuck.
- In Qooling, go to Integrations and click Generate token on the Okta integration row.
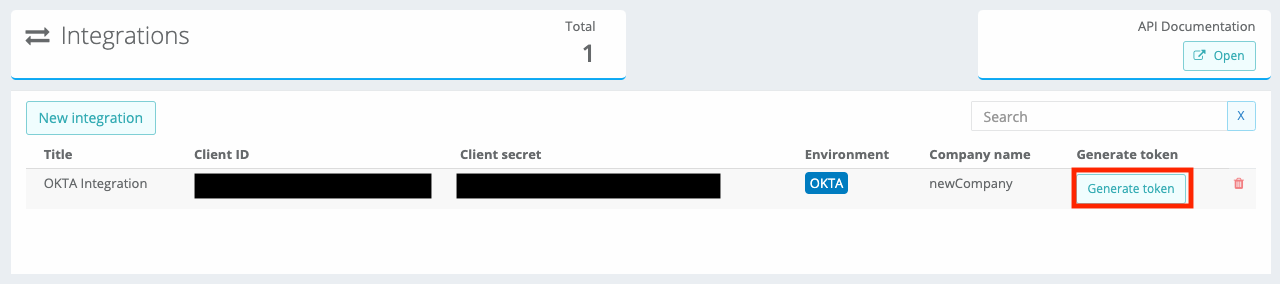
Qooling Integrations — click Generate token on the Okta row.
2. Copy the token that appears. Keep this window open, or paste the token somewhere safe — you will need it in the next step.
Copy the generated token.
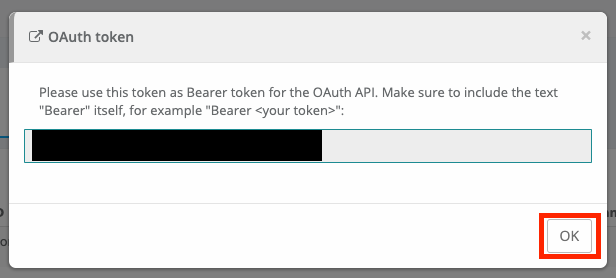
Treat this token like a password. It grants access to your Qooling user directory. Store it securely and generate a new one if you believe it has been exposed.
Step 4 — Connect provisioning in Okta
- In your Okta application, go to the Provisioning tab and click Configure API Integration.
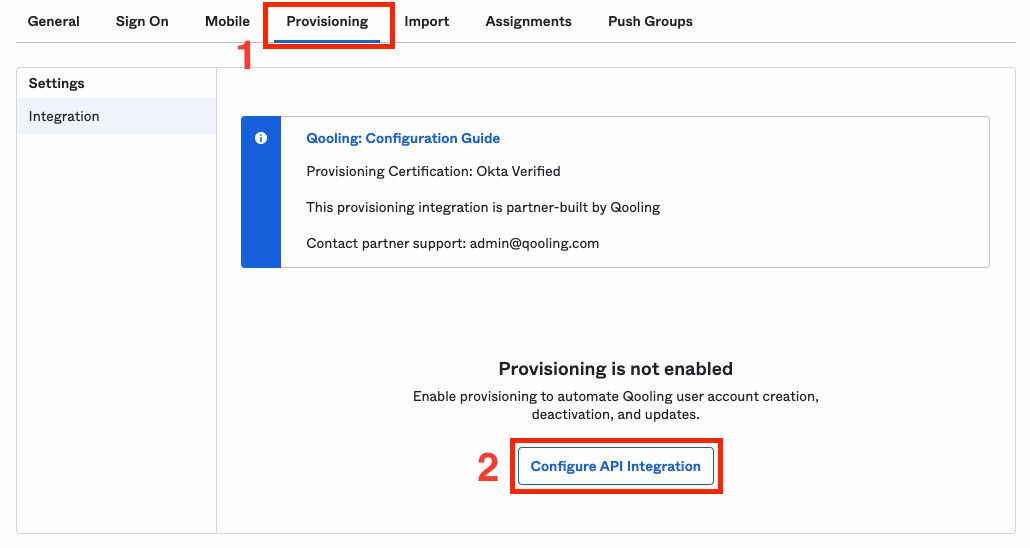
Okta application, Provisioning tab — Configure API Integration.
2. Tick Enable API integration.
3. Fill in App ID — the same 0oa… value you used in Step 1 — and paste the token from Step 3 into API Token.
4. Click Test API Credentials to confirm the connection, then Save.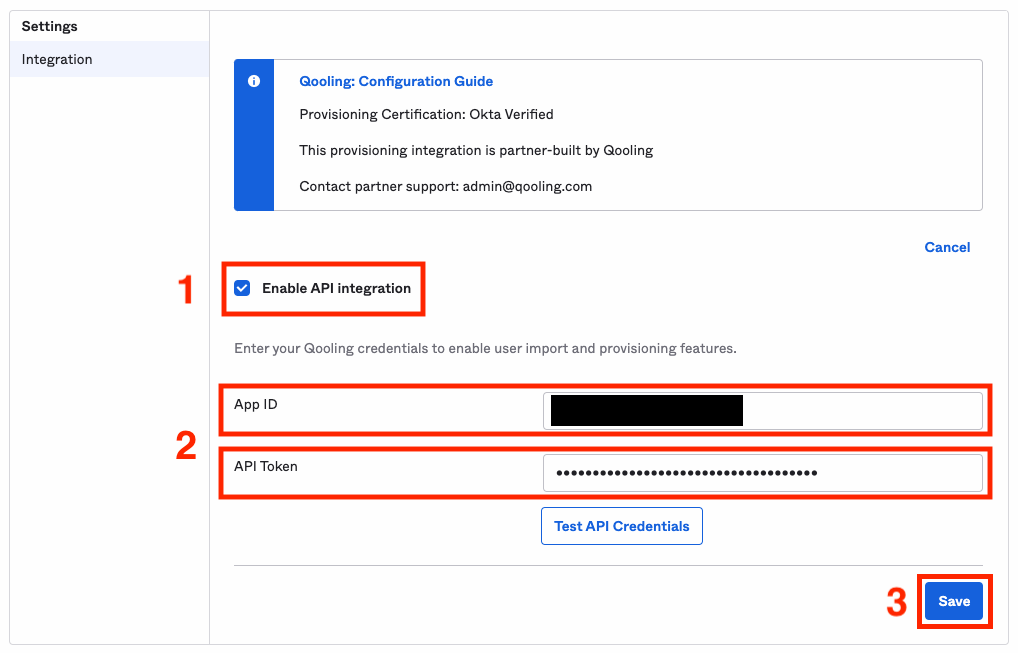
Enable API integration, enter the App ID and token, then Save.
Step 5 — Turn on the provisioning actions
?
Do not skip this step. Connecting the API in Step 4 does not by itself sync anything. The individual actions are switched off by default in Okta, and nothing will happen until you enable them — with no error message to tell you why. This is the single most common reason a setup that "looks finished" does nothing at all.
- Still on the Provisioning tab, select To App in the left-hand menu and click Edit.
- Enable:
- Create Users
- Update User Attributes
- Deactivate Users
- Click Save.
Step 6 — Check the attribute mappings
Enabling Update User Attributes is not quite enough on its own. Each individual attribute has its own setting for when it applies.
- On the Provisioning → To App screen, scroll down to the attribute mappings.
- For givenName and familyName, make sure each is set to Create and update rather than Create only.
If they are left on Create only, new users will be created correctly but later changes to their name will never reach Qooling — which looks like updates being broken.
Email is deliberately not in that list. Provisioning does not change a Qooling user's email address, so the email mapping has no effect on what Qooling stores.
Step 7 — Assign users
Assign people to the Qooling application in Okta as you normally would, from the Assignments tab.
If a person already exists in Qooling, Okta recognises them by email address and updates the existing account rather than creating a duplicate. This is expected and correct — you do not need to remove people from Qooling first.
Test your setup
From Qooling (SP-initiated):
- Go to your Qooling login page.
- Click SSO Login.
- Enter your email address and click Login.
You should be taken to Okta to authenticate, then returned to Qooling and signed in.
From Okta (IdP-initiated): click the Qooling tile on your Okta dashboard.
What happens when you change things in Okta
| In Okta you… | In Qooling the user… |
|---|---|
| Assign a new person to the application | Is created, and can sign in through SSO |
| Change a name or email address | Is updated — provided the mappings are set to Create and update (Step 6) |
| Deactivate the person, or unassign them from the application | Is archived. They keep their history but can no longer sign in. |
| Push the passive role | Is given the No login role. This is not the same as deactivating — they remain an active user who cannot sign in. |
| Reassign someone you previously unassigned | Comes back, but see the warning below. |
⚠️
Reactivating a user can reduce their permissions. If you unassign someone and later reassign them without specifying roles, they return with view-only access and their previous roles are removed. Check and restore their roles in Qooling after reactivating anyone.
Troubleshooting
Okta reports an error mentioning an application "not linked to any Qooling company"
The App ID is wrong. Either the example value was pasted instead of your own, or the exk… value was used in place of the 0oa… one. Re-copy it from the App Embed Link on Okta's General tab (Step 1).
Everything looks connected, but no users appear in Qooling and there is no error
The provisioning actions were never switched on. Go to Provisioning → To App → Edit and enable Create Users, Update User Attributes and Deactivate Users (Step 5).
The Okta option does not appear when adding an integration in Qooling
The modules are not enabled on your contract yet. Email admin@qooling.com.
New users are created, but changes to their names never arrive
The attribute mappings are still on Create only. See Step 6. (Email addresses are a separate case — provisioning never updates them, by design.)
A user says their Qooling password is correct but they cannot sign in
This is expected. Once someone is provisioned through Okta, password sign-in is switched off for that administration and they must use SSO Login. The login page will show a generic "Invalid username and password" message rather than explaining this, so it is easy to misread as a password problem.
Provisioning succeeds but SSO sign-in fails for people who already existed in Qooling
This was a defect in older Qooling releases affecting users who existed before the connector was set up. It is fixed in current versions — contact support to confirm your version.
Need help?
Contact admin@qooling.com with your Okta organisation name and a description of the step you are stuck on. If provisioning is failing, the error text Okta displays is the most useful thing you can send us.
Was this article helpful?
That’s Great!
Thank you for your feedback
Sorry! We couldn't be helpful
Thank you for your feedback
Feedback sent
We appreciate your effort and will try to fix the article